Tuesday, September 27, 2011

MFT Wednesday Stamp Club Sketch

This is the first time I have participated in MFT's Wednesday Stamp Club Sketch (try saying that 10 times fast...lol!) 

Here's the sketch...

and here's what I came up with...

My version varies just a bit, but I followed the general layout.  I just love the way it turned out, so cute and sassy!  Listed below are the products I used to create this project:

Hocus Pocus 6x6 Petite Paper Pad by Pink Paislee
Kraft Cardstock by PaperTrey Ink
Black Cardstock from my stash
Who's That Girl - Totally Witchin' stamp set by MFT
I Am Roses Flowers - R21 - 1 and R21 - 274
I Am Roses Leaves - ZQ L0 - 0 
Lindy's Stamp Gang Sprays: Jazzy Jivin' Purple and Marigold Yellow Orange
CTMH Inks: Petal and Archival Black
Memento Tuxedo Black Ink
MFT Circle Die-Namics
Misc. Ribbon & Lace from my stash

Copics: 
E000, E00, E11, E21, E40, E41, E43, E71, E74, E77, E79
100 (Black), T5, T6
V91, V93, V95, V99
YR65, YR68, B000, 0 (Colorless Blender) 

Hope everyone has a whimsical week! :)

Sunday, September 18, 2011

Fall Altered Metal Sign

I picked up this adorable orange metal sign at Hobby Lobby for $2.50.  What a steal, right...??  I have been looking for a cute sign to hang from the door in my classroom, but haven't found anything that wasn't Halloween or Thanksgiving specific...so I decided to create something.

I just love the way it turned out and I think my kiddos are going to like it too!!  At the bottom of this post is a list of the supplies I used to create this wonder-fall sign... Hehe :)

Here's a close-up of the beautiful I Am Roses flowers that I altered with LSG sprays.
Isn't that shimmer gorgeous?!?


The floral picks that are nestled behind the flowers originally had white berries, but I changed them using the Glimmer Mist sprays listed below.  I just used a paintbrush to color the berries up!  Here's a pic of what the floral picks looked like before.

Supplies Used:
Small Green Leaves by I Am Roses
Big Brown Leaves by I Am Roses
Small Brown Leaves by I Am Roses
Big White Puffy Daises by I Am Roses
Brown Cherry Blossoms by I Am Roses
Indian Corn Glimmer Mist by Tattered Angels
Sugar Maple Glimmer Mist by Tattered Angels
Twigs from my yard
Floral Picks from JoAnn's

I just love how my sign turned out and can't wait to hang it from my classroom door tomorrow!  Hope everyone had a whimsical weekend. :)
Wednesday, September 14, 2011

Masculine Birthday

So my father-in-law's birthday is coming up and I needed a masculine card.  Masculine is so hard for me....but I persevered and ended up with a pretty cute card, if I may say so myself. Hehe :)

I used the Tattered Time paper collection by DCWV.  This is about the only paper stack that I own that is masculine, so it tends to be my "go-to" for manly cards. 

Here are a list of products I used to create this "manly" card:
Kraft Cardstock by Papertrey Ink
Mini Kraft Tickets by Maya Road
Sprocket Gears by Tim Holtz

I love how "vintage" this card looks.  It turns out I don't have to use bling and flowers on every project.....haha.  Hope everyone had a whimsical Wednesday! :)

-Andrea

Handmade Birthday Present

My Mom's birthday is this weekend, so I decided to create something especially for her.  I have had these large word letters in my stash for over a year and haven't done anything with them.  So, I decided it was time to get them out and alter them up! Lol.  I purchased the wood letters from ADORNit.  The letters spell H-O-M-E.  Here's a pic of what they look like on the website.

They adhered paper to the wood letters, but I chose to go another route.  I started out painting each letter with my LSG Dark Chocolate Truffle Color Shot and then edged them with gold Rub n' Buff.

I then decorated each letter with some items from my stash.  I used some paper and other goodies from the Reflections collection by Prima.  I also used a ton of I Am Roses products.  

Here is a list of the different IAR products that I used:
Brown Cherry Blossoms S3-578
Brown Curly Roses G3-578
2" Pale Brown Roses R40-40
1" Brown Roses R5-40
2" Brown Roses R77-40
1" Brown Roses R6-827
Natural Skeleton Leaves K1-805/Z
Small Green Leaves ZQ L0-0

Here's a closer look at each letter:
I created the rosette out of an old dictionary page and then inked it up with my TH Vintage Photo distress ink.  The key is from my stash and attached with some burlap string by May Arts.  The green sprig is from JoAnn's.

All this letter needed were some beautiful I Am Roses products.  I just love the rich colors, so great for Fall! :)

I cut the doily out using the Open Scallop Doily Die-Namics by MFT. and weaved some more burlap string through the scallops.  The butterflies are brass charms from LSG.  I altered the bottom one with Midnight Copper Obsidian embossing powder by LSG and the top buttefly with copper alcohol ink by Tim Holtz.

Another letter featuring some more beautiful I Am Roses products.  I just love the skeleton leaves, they are so much fun to put on your projects.

I used some jute that I purchased at Wal-Mart Neighborhood Market to hang each letter from.  You never know where you are going to find something that you can incorporate into your projects!  Haha :)

I also created a matching card to go with my gift.  I used the same Prima paper collection and some more beautiful IAR products. 


This project has made me so excited for the upcoming Fall season.  I am in love with these dark, rich colors!   Hope you enjoy my projects and your day is filled with Love & Whimsy. :)

- Andrea

Sunday, September 11, 2011

"Create" Pennant Banner

After watching an awesome "Vintage Banner" YouTube vid by Jo, I was inspired to create a banner myself.  Here's how it turned out....
I just love how it turned out.  Now let me tell you how I created this fun little project.

I created the base using some leftover cardboard that I cut out using my Sizzix Framelits Banner die.  I then stained the banners with my LSG Dark Chocolate Truffle Color Shot.
I used the Ladies & Gents and Trendsetter petite paper pack by Webster's Pages.  I cut out the inside banner using the smaller banner framelit die.  I also used some of the Images & Phrases stickers from the collection.  I used my Crop-A-Dile to punch holes in the corners so I could run seam binding to string the banner together.

I accented the banner with lots of cute little embellishments.  I used my all-time favorite bling from CTMH - Opaques Mocha Adhesive Gems and some burlap squares by Canvas Corp.
  
I also used Maya Road chipboard and corrugated shapes by Jillibean Soup.  I love Maya Road chipboard, they have the cutest shapes and you can alter them to match any project.  I used the Mini Chipboard Cameos Set and the Birds w/ Cages Mini Chipboard Set.  

I used a lot of different LSG products, paints, and even some crackle medium to alter the embellishments.  Here are the LSG colors I used: Green with Envy Green Starburst StainTainted Love Teal Starburst Stain, and Desert Moon Cactus Gold Glitz Spritz.  

I also used some of my favorite MFT dies.  Here are the ones that I used: 1/4" RosetteButterfliesDizzy Doily Duo (not pictured!), First Place Award Banner, and the Sweet Stack Labels.

And of course, I had to include flowers on my project.  Most of them are from I Am Roses, but the turquoise flowers are by Prima and the white branch came from JoAnn's.

Here's a close up of each pennant. 


 I will post a video showing how I created the banner in a few days when I am feeling a bit better.  Hope everyone is having a whimsical Sunday! :)

Saturday, September 10, 2011

MFT Die-Namics Storage

I'm back with another storage idea.  I created a book a few months ago to hold all of my MFT Die-Namics, but I have quickly ran out of space.  Here's what I have been using to hold all of my wonderful dies.....
...but now the book will no longer close! LOL.  So, I knew I needed to find another solution.  I created a magnetic board that hangs above my workspace.  I used foam board that I purchased at Wal-Mart (you know, the kind you use for school projects) 
and adhered some magnetic sheets that I purchased at Create for Less.  I then used Command Adhesive strips like the ones below to attach it to the wall.

Here's how it turned out.
Thanks for stopping by.  Have a whimsical weekend! :)

Monday, September 5, 2011

I Am Roses Design Team Entry

I just submitted my entry to be on the I Am Roses Design team....wish me luck! ;)  All participants had to create 2 projects using I Am Roses products, not a stretch for me to say the least...haha.

Project 1: Tissue Paper Mini Album - "Fallin' for You"

I used 5 tissue paper rolls that I painted with dark brown acrylic paint and then sprayed with LSG Dark Chocolate Truffle starburst stain.  I then ran them through my Big Shot to flatten them a bit.  I used the new fall collection by Bo Bunny, Forever Fall.  I edged all of the papers with my Tim Holtz edge distresser.  I created the pull out tags from the scraps I had leftover.

The front cover features a beautiful IAR flower that I sprayed with LSG Cajun Carnelian Red starburst stain and oh how beautiful it turned out.  The teal crocheted flower is also from IAR.  I accented both flowers with IAR leaves that have been inked with TH distress inks.  I tied some seam binding, tulle, and lace to the jump ring and added a cute little key charm.

Both of these pages feature IAR leaves and an itty bitty IAR rose that I edged with Vintage Photo distress ink.  The tickets were created using the Die-namics Just the Ticket and Stamp Set by MFT.  I created the burlap rosette and added a TH muse token.

The left page features 2 adorable flowers by IAR.  I accented the adorable brown and white flower with 2 mulberry paper leaves.  The vintage looking flower  started as IAR loose hydrangea petals that I sprayed with LSG Buccaneer Bay Blue Moon Shadow Mist and accented with a burlap leaf I cut out using the Mini Branch & Leaf die by TH and of course.....a touch of bling is always necessary! :)

The right page has a sweet piece of brown lace holding 3 journaling cards that have been kept together with a paper clip.  The lace is accented with 2 IAR flowers that I sprayed with LSG Polished Copper Glitz Spritz (no longer available).

The left page features my all-time favorite flowers, cherry blossoms!  The lace from the opposite page shows on this side and is the perfect spot to tuck a photo.  The "Autumn Day" rub on is from my stash.

The right page is my favorite.  I used the Scallop Lace Envelop die by Sizzix to hold some cute journaling cards and closed it with a Maya Road stick pin.  At the bottom is a gorgeous IAR flower accented with brown and green leaves and a touch of bling.

I love these pages too!  The left page features an IAR puffy daisy that started out white.  I sprayed it with LSG Cajun Carnelian Red starburst stain and added some brad bling by Recollections.  The branch was cut out using the Mini Branch & Leaf die by TH and accented with IAR leaves.  The chipboard sentiment is from my stash.

The right page has a frame that came as a cutout from the paper collection.  I cut out a bird using the Bird & Cage die by TH.  I sprayed the bird using LSG Screamin' Banshee Black starburst stain.  I layered a beautiful IAR flower with a double-bow tied with burlap string and a few tiny leaves that I inked with TH walnut stain distress ink.  I added a trio of Recollections bling to finish it off!

The final page has 3 tags attached with a clothespin.  I layered some swirly bling, a jean flower (I cut out a flower from an old pair of Seven jeans using a Sizzix die), some tiny leaves, and topped it with a brown-edged mini rose.  I inked the 4 leaves using TH distress inks: Peeled Paint, Fired Brick, Vintage Photo, and Walnut Stain.

The sentiments I used throughout the mini came from several stamp sets:
Autumn Splendor by CTMH (Retired)
Something Splendid by CTMH (Retired)
Limited Edition by CTMH (Current Stamp of the Month!)

Project 2: Card - "I Treasure You"

The papers I used are from the Perfect Day collection by CTMH.  I edged all the papers with TH Distress Ink in Vintage Photo.  The adorable mermaid stamp is from the stamp set "Who's That Mermaid?" by MFT.  I colored the stamp up with my Copic markers and here are the different combos I used.

Skin: E000, E00, E11, E21
Sand: E30, E31, E33, E34
Water: BG11, BG13, BG15, BG18
Sky: B000, B00, B01, Colorless Blender
Fin: BG72, BG75
Top: R59

I colored the mermaid's fin with my Copic markers and then used my LSG Magical Micas in Tainted Love Teal.  Isn't the shimmer gorgeous?

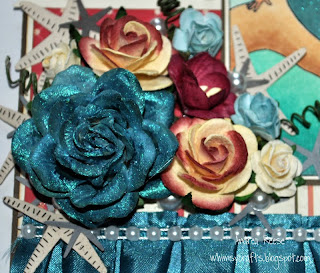
I used some aqua satin pleated trim by Maya Road and then topped it with some flat back pearls that I had in my stash.  I combined a bunch of flowers from IAR and used some starfish and shell die cuts and tucked them in like leaves. I just love how cute this is.  The large teal flower was originally white, but I used my LSG Magical Micas to color this up too!  I also nestled in some pearl accents to fill in the gaps. 
The sentiment is from the Who's That Mermaid?" stamp set by MFT and the banner is from a die by MFT as well - Die-Namics First Place Award Ribbon Die & Stamp Set.  I just cut one of the banners in half.

Here's a peek at the inside.....

Have a whimsical afternoon! :)