Sunday, August 19, 2012

Lindy's Stamp Gang Back to School Special

It's Back to School time and Lindy's Stamp Gang has 7 delectable colors for all your Back to School projects!


Yellow Rose of Texas
Marigold Yellow Orange
Alpine Ice Rose
Rudolph's Nose Red
Witch's Potion Purple
Bachelor Button Blue
Cathedral Pines Green

Purchased separately: $35
SPECIAL BUNDLE PRICE: $27

Only available together until September 4, 2012
Click HERE to purchase your set today! :)

Saturday, July 14, 2012

Summer "To-Do List" Projects


I L-O-V-E being off work during the summer. I have the ability to start and finish so many projects that I long to do on the weekends, but usually lack the energy and/or time. So, here's a peek at some of the projects I have finished this summer. 

PROJECT #1 - Altered Spice Carousel 
I picked up this 1970's vintage spice rack at a flea market a few years ago and it has been patiently waiting to be altered. I painted it with a coat of turquoise acrylic paint. I only used one coat, because I liked the wood showing through in some places. I created the spice labels using some chalkboard scrapbooking paper and an EK Success punch. I wrote on the spice labels using a chalk pen. 

PROJECT #2 - Scatter Frames 
These frames all came from a flea market and cost only $1 each. I painted them all black and roughed them up with a bit of sandpaper. They are each hung with a tiny nail and have Command poster sticky strips on the back to keep them level.  I love a cheap and cheerful project!

PROJECT #3 - "Uncentered" Towel Bar Dilemma
I've never been a fan of how the builder didn't center the towel bar over our garden tub, so I decided to make it look like it was put there "on purpose." I bought this vinyl saying at Hobby Lobby and scored the scone for $3 at a flea market because the glass votives were missing. No problem there, I just added 2 candlesticks I had around the house. 

PROJECT #4 - Update Master Bedroom Decor 
I painted and distressed this frame and then added a piece of burlap that has been painted using a stencil. 

Random vintage findings from flea markets to accent the dresser. 

I love this lantern I found at a flea market. I added a bird's nest inside for a touch of whimsy! 

PROJECT #5 - Kitchen Decor Change-Up 
I have decided to change my kitchen colors after finding this adorable buffet. The kitchen redo is still going on, but I did hang these plates on the wall. (Total project cost = $10) I used plates from my china cabinet, so all I had to buy were the adhesive plate hangers from Hobby Lobby. New curtains, placemats, and recovered chair pictures coming soon!!! 

PROJECT #6 - Utility Room 
I painted this old frame and distressed it a touch and added some cup hooks to hold keys from.

This frame was painted red and then I sprayed a piece of wood with chalkboard spray paint. Perfect place to add all those projects to hubby's "Honey-Do" list. :)

I still have 3 more projects that I haven't quite finished for the utility room, but will be posting pics of those soon as well. 

PROJECT #7 - Dining Room 
I bought this canvas and it started a complete overhaul of the dining room.  I grabbed a bunch of decorative twigs and bound them with a piece of burlap to accent the corner of the canvas. I also had the table painted and distressed to match the other furniture pieces in the room. Melinda at Figgy Pudding did an amazing job!! 

I picked up this burlap runner at a local flea market, isn't it so adorable? 

4 more weeks left of vacation and I still have almost 25 things left on the master "To-Do" list, better get busy. I will post more project pictures soon. Hope everyone's weekend is filled with Love & Whimsy! HUGS :)


Friday, June 29, 2012

Patriotic Nesting Boxes

Hi everyone, hope you guys are having a fantastic Friday!  It's Andrea, from the LSG Design Team, with a Fantastic Designer Friday project.  The 4th of July is quickly approaching and I adore decorating for this fun summer holiday.  I am the self-proclaimed "Nesting Box Queen," so I had to create a set that displayed my love for the USA.  

The nesting boxes start out looking like this, just basic paper mache.  I don't prime or paint the boxes before spraying them with LSG sprays, as I like the kraft color to peek through here and there.

I started by painting my boxes with LSG Starburst Sprays.  I love how versatile LSG sprays are.  You can spray with them or take off the lid and dip in a paintbrush and paint with them.  I chose to paint my boxes.

This box was painted using "Afternoon Delight Denim."  I paint the box and then rub it in with a paper towel (the paper mache soaks up the color better this way).

I painted the middle box using "Rizzo's Rowdy Red" (a new Flat Fabio set being released July 15th).

The top box was painted with a coat of white acrylic paint and then sprayed with Scintillating Silver.

I love to add a touch of stamping to one of my boxes, so I decided to use some LSG Two-Toned Embossing Powder to really give my stamping a special touch.  I started out by gathering varying sized star stamps from several stamps sets.  I like to rub my nesting box with my embossing buddy before stamping my image with VersaMark ink.  I then sprinkled on some "Midnight Bronze Obsidian Embossing Powder" and set with my heat gun.

And here's how it turned out...

I added some trim and a few more embellishments to accent the boxes.


I enjoyed sharing this project with you today and be sure to check back next week to see what gorgeous project our next designer has up their sleeve. Hope everyone has a great weekend!  HUGS :)

Friday, June 15, 2012

I'm BACK...with some masculine projects!!!

Hi everyone, I'm back!  I haven't created anything in about 2 months, I haven't had any energy but I'm hoping that because I am now in the 2nd trimester my energy levels will SOAR! :)

Father's Day is coming up...here's a card I created for my FIL.


I used a combo of Graphic 45 papers: Communique, Transatlantique, and A Proper Gentleman. I also used some random Graphic 45 staple products I had in my stash.

Here's a peek inside...

I used a new stamp set I received a few months ago, but haven't used yet.  It was the perfect fit for this Father's Day card.


I also created a card for my Grandfather's birthday next weekend.  He will be turning 80!!  I used papers from Communique, Transatlantique, and A Proper Gentleman collections by Graphic 45 on this card as well.

I sprayed a manila shipping tag with LSG Dark Chocolate Truffle SS.  The stamp set I used is the "Just My Type" set by MFT.

I used random scraps that I had left over to decorate the inside.

Other products used not listed above:
TH Walnut Stain Distress Ink
TH Edge Distresser
Black & Cream cardstock
Kraft cardstock by PaperTrey Ink
TH Ideaology Sprocket Gears
Black Hemp by CTMH
Gypsy Mini Ephemera by 7gypsies

I'm glad to be back and I hope you enjoyed today's projects.  Hope everyone has a fabulous weekend!  HUGS ♥♥♥

Wednesday, May 16, 2012

Creating is Fun Baby Blog Hop

Hi guys! Today, the Creating is Fun DT gals and I are hosting a Baby Blog Hop. Each DT member has created a project using some goodies from Creating is Fun.


One winner will be selected at random to receive a wonderful prize package, which will consist of a $25.oo gift certificate to Creating is Fun ... so be sure to hop along and leave a comment on each DT's blog post to increase your chances of winning!

Now on to what I created.

I created this adorable little pocket mini for a friend.  She wanted an album with pics of her daughter to give to her Mother-In-Law.

This sweet little girl loves the camera so much, I had a terrible time only picking 9 photos. :) I printed the photos out on my Kodak PictureMate and left a white border on each one.  The mini-album kit is from the "Amy Butler" collection by K&Company.  The kit came with lots of cute little embellishments.  I used some of the twine that comes on the Manila Shipping Tags to tie on the sweet blue tag on the right.

On the left page, I added a layer of Light Purple Lace and a Lilac Button from Martha's shop that I threaded with some twine for the Manila Shipping Tag.  I used a bit of Light Purple Ric Rac on the right page.

Aren't these pics, the cutest?  I adore her precious looks!  I used some more of that Manila Shipping Tag twine to thread through the tag on the left.  I used a Small White Tag that I sprayed with LSG "Cotton Candy Pink" for the page on the right.

I used another Neutral/Beige Button threaded with the Manila Shipping Tag twine.

On the left page, I used a bit more Light Purple Lace.  I left the frame open at the top on the page on the right, so she could write a small note to her sweet Mother-In-Law.

I ♥ how this album turned out, so sweet and simple! :)

Other Products Used Not Listed Above:
Pearl Rhinestones by CTMH
Small Crochet Flower by I Am Roses (ZJC1 - 601)
Foam Adhesive

Next up is Hannah. I'm sure she has something gorgeous to share with you! In case you get lost along the way, here's a list of the DT member's participating in today's blog hop.

Andrea (You are Here!) 

Thanks so much for stopping by today and best of luck winning.  Don't forget to comment as you hop along to increase your chances of winning!  Hope everyone has a great rest of the week.  HUGS :)

Saturday, May 12, 2012

Creating is Fun: Mother's Day Card

Hi everyone, I have a project to share with you today for Creating is Fun.  I created this quick and simple Mother's Day card using several items from the CIF Shop.


Other Products Used:
Kraft Cardstock by PaperTrey Ink
White Cardstock by PaperTrey Ink
"Jubliee" Collection by K&Company
"Mom - Renee" Embellishments by MMBI
Memento "Rich Cocoa" Ink
"Vertical Greetings Stamp Set" by MFT
"Open Scallop Doily" Die-Namic by MFT
"Small Simply Scallops" Border Die-Namic by MFT
"3/8 inch Rosette" Die-Namic by MFT

Be sure to stop by Creating is Fun and pick up some gorgeous lace, trims, or buttons.  I hope everyone has a wonderful Saturday and a very Happy Mother's Day! HUGS :)

Monday, May 7, 2012

May IARCC

I can't believe it's already May!  That means it's time for another I Am Roses Color Challenge. It’s happening right now. Here’s your chance to win some amazing flowers. Head on over to the I Am Roses Challenge Blog for more details and challenge rules.


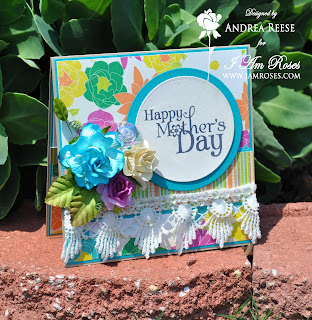
Before you leave I want to share with you the project I created for this month's challenge.  Mother's Day is right around the corner, so I have quite a few cards that I need to make.  I ♥ how retro this card turned out, not what I originally had planned...but sometimes that's how it works out! :)

This month's color challenge was to use purple and teal/turquoise.  In my stash I found the "Flea Market" 8x8 Specialty Paper Pack by Making Memories that had both colors in it, so I knew it would be perfect for this card.  I layered the DP onto some Kraft Cardstock by PaperTrey Ink.  I stamped the sentiment using the "Happy Mother's Day" stamp by Verve Stamps onto some Cream Cardstock by PaperTrey Ink that I had sparyed with "Royal Amethyst Fire" Glitz Sprtiz by LSG.

Since the card was looking a bit 70's-ish, I thought this white fringe lace would be perfect!  I added a row of iridescent flat-back pearls on top of the lace. 

Here's a peek inside... 


Other Products used:
Teal Cardstock
"Delightful Things" stamp set by CTMH
Flat-back Pearl Trim from Karlas001
White Fringe Lace from CreatedbyMartha
Leaf Trinket Pin by Maya Road

I hope you will join us for this month's I Am Roses Color Challenge.  You can get all of the details over at the I Am Roses Challenge Blog.  You can also check out a quick video of my card HERE.  Thanks so much for stopping by today.  I can't wait to see what you will create! HUGS :)

Monday, April 30, 2012

Mother's Day Lace Rosette

Hi everyone.  I have a project to share with you today for Creating is Fun.  I created this over-sized floral rosette using some gorgeous lace from Martha's shop.  I thought it would be super cute to embellish a gift for Mother's Day.  You could attach it to a gift bag or even to a flower pot that you've covered with fabric.  I added a pin back to mine so I could attach it to something! :)

I started out by cutting a large circle of cardboard.  I then hot-glued some 5" Purple Lace into a circle.  Next, I cut out several strips of pink lace (each measuring about 5-6" long).  I then hot-glued one end of the lace to the center of the rosette and folded the pink lace back and hot-glued again in the center, creating a loop of pink lace.  I added a touch of pearl trim loops and finished off with some I Am Roses flowers.


Creating is Fun Products Used:
Pink Lace (no longer available)

Other Products Used:
Cardboard
White Pearl Trim
White & Pink Roses from I Am Roses (R 77 - 41)
Stick Pin
Pin Back
Hot Glue

I ♥ how this turned out.  This would be a great way to use up any lace/trim scraps that you have laying around.  I hope you enjoyed today's project and don't forget to stop by the Creating is Fun shop!  Have a great week everyone. :)  HUGS ♥♥

Sunday, April 29, 2012

"You've Had a BIG Impact" Card

Hi guys! I hope everyone is having a super Sunday. I have a simple card to share with you today. Sadly, this will be my last project for Karlas001. I have enjoyed my 2 month term as a Featured Guest Designer for Karla's Etsy and am so sad to see it come to an end.

I created this super simple card using the new "Kraft Funday Happy Days" 6x6 Paper Pad by My Mind's Eye. I ♥ how dressy this card turned out, not what I had planned in the beginning! :) 

I cut up some of Nancy's Black 1.5 inch Rose Trim and placed the rosettes in a cluster. I added some pearl loops behind the cluster using some 6mm Black Pearl Trim.

Here's a peek at the inside...


Karlas001 Products Used:

Other products used not listed above:
Black cardstock
Kraft cardstock by PaperTrey Ink
Black Licorice Ribbon by MFT
Black Pearls by Recollections
"Big Greetings" stamp set by MFT

You can check out a video of my card HERE. I have thoroughly enjoyed being a Featured Guest Designer for Karlas001 and want to thank Karla for allowing me this opportunity. I hope everyone has a fantastic upcoming week! HUGS ♥♥

Sunday, April 22, 2012

Domestic Goddess Layout

Hi guys, I hope everyone is having a fabulous weekend!  I have a project to share with you today for I Am Roses.  My dad recently found this photo of my Grandmother when they lived in Japan.  I loved how nostalgic it looked and I knew I would be able to find the perfect papers in my Graphic 45 stash!  I decided to create a layout using some gorgeous IAR products.

And here's how it turned out...

I had so much fun creating this layout.  I love how the papers match my Grandmother's outfit so well.  I used several different collections by Graphic 45, I ♥ how the collections match one another.  


I Am Roses Products Used:
White 2" Roses (sprayed with LSG "Clam Bake Beige")
White 1" Roses (sprayed with LSG "Clam Bake Beige")

Other products used not listed above:
"Domestic Goddess" Collection by Graphic 45
"Times Nouveau" Collection by Graphic 45
"Fashionista" Collection by Graphic 45
Color-Ready Kraft Borders by CTMH
Vintage Photo Distress Ink by Tim Holtz
Vintage White Lace by Karlas001
White Peal Sprays by Karlas001
Small Red Organza Rose Trim by Maya Road


Click HERE to watch a video of my LO.  Thank you so much for stopping by today.  I hope everyone has a wonderful Sunday.   HUGS ♥

Saturday, April 21, 2012

Color Me Copic Club: "Look on the Bright Side" Card

Hi everyone, I have a quick project to share with you for the Color Me Copic Club DT.  A few weeks ago, it rained for almost a week straight.  I never thought I was going to see the sun again! LOL.  So, I created a card to send to a friend.  I ♥ how it turned out.


Isn't she a doll?  I adore MFT stamps.  They are so much fun to color up with your Copics.  I paper-pieced her boots using some of the DP. The Copic markers I used are listed below.

Skin: E000, E00, E11, E21, R20
Hair: E25
Rain Coat: Y13, Y15, Y18
Jeans: B93, B95, B97
Umbrella: T4, R81, R83, R85
Puddle: BG000, B01
0 Colorless Blender  

♥ creating paper flowers.  I used the "Botanical Beauty Die-Namic" by MFT.  I am elated with how this one turned out.  So much fun to make!! :)


Here's a peek at the inside...


Other Products Used:
"ALM - The Rainbow will Come" stamp set by MFT
"WTG - Puddle Jumper" stamp set by MFT
Memento Tuxedo Black Ink
Perfect Panels for Copics by MFT
"Springtime" 6x6 Paper Pad by Echo Park
Kraft cardstock by PaperTrey Ink
Burlap String by May Arts
Purple Rhinestone Adhesive Gems by CTMH
"First Place Award Ribbon Die-Namic" by MFT
"Classic Scalloped Rectangles Large Nestabilities" by Spellbinders


You can check out a video of my card HERE.  I hope you enjoyed today's project.  Thanks for stopping by today.  HUGS